Image editing tools are great at automatically selecting geometric shapes like circles, squares, and polygons. But real life is almost never so orderly. Most photos are full of dynamic people, organic shapes, and varied textures that need to be isolated by hand before you can work with them.
 Regular geometric objects like this basketball can be selected using simple tools. |
 No combination of squares and circles will make a good selection for a shape as dynamic as a human body. |
To edit the complex and irregular objects of everyday life, we need to add some better tools to our arsenal. One of the most powerful and precise solutions is the pen tool. The pen tool uses smooth paths and curves to let you draw a complex outline around just about any object. You can edit, refine and move this path as much as you like, and turn it into a selection when you're done. To see the pen tool in action, download the picture below and open it in your image editing program. Then, follow along with this video to select the shape of the flower using paths. Save your work: you'll be turning in your modified image later in this lesson.
 |
 |
![]()
NARRATOR:
You should have this flower image open in your editing software and we want to select this flower that’s the subject of the photo. But no combination of ellipses or rectangles is going to give us the kind of selection that we want. We’re going to need to upgrade our tools. And to do that, we’re going to turn to the pen tool.
The pen tool is right here, it looks kind of like a calligraphy pen. And it’s perfect for selecting irregular borders like this one. The first thing you’ll notice about the pen tool is if you click and drag, it doesn’t draw a line like you think it does. It behaves in sort of a strange way if you’re not used to it. So let’s undo this. And to give you a better idea how this tool works, we’re going to make a new image. So please follow along with me so you can get a feel for how this tool behaves.
Let’s go FILE > NEW, and we’re going to call this one “pen tool practice.” And make it 576 by 576 so we’re going to make it a square. 72 pixels per inch with a white background. Go ahead and hit OK.
So again, the pen tool doesn’t draw like a traditional drawing tool. It’s not like the paintbrush tool where you click and drag and kind of make whatever line your mouse follows. See how your mouse makes a really uneven line and is not very precise? The pen tool is made for making extremely precise lines. These precise lines are called “paths.” And you can see the paths window in the layers palette. It’s right here, you click on this tab; if you can’t see it, you just go WINDOW > PATHS and it should come up. And you’ll notice when you select the pen tool and start creating a path, a new path appears as a Work Path in this window.
So if you click and let go, click and let go again, you’ll notice that the pen tool draws a straight line between those two clicks. On either end of that line are two boxes, and these are called “anchors.” Every time you click and let go, you create a new anchor. If you click on the first anchor you drew, it will close the path. You can actually see here in the work path window that you’ve got a closed path. Let’s go ahead and throw this away because again, perfectly straight lines, those are not going to help us make a perfect selection of this flower. Right? You see all this? We’re not selecting this, we’re selecting this green area here, that’s not going to cut it. We want to get a much better path going. We want to go ahead and throw that one away.
So to make the selection that we want, we need to start using curves. Now this is a little complicated, and the best way to learn it is to play with it yourself, so don’t be shy about experimenting, remember your buddy the UNDO button. You can always go back and undo it. But just to get us started, the two things that really control a path are the anchors, which I’ve already shown you, and the “handles.”
If you click and you don’t let go, you hold down and you drag, look what happens. The program creates two handles. And these handles, you can think of them almost like magnets. They pull on that line and they help you make a curve. So if you wanted to make like a semi-circle shape, you would pull the handles sort of far, and you make kind of a semi-circle shape.
So paths are really flexible because they allow you to make these sharp corners and these nice broad curves. If something’s really detailed, like say a mountain range, or the blade of a saw, you can make a lot of anchor points. If something is round and smooth and curvy, you can use a few anchor points and make a nice smooth curve.
So let’s go back to our flower, and I’m going to start selecting the outline of this flower. And like I said, you’re going to want to experiment on this on your own, you’re going to want to do it your own way, and it might take you a little bit of practice to get a handle on the path tool and the pen tool. But once you do it’s going to open you up to a lot of flexibility and a lot of precision in complicated selections.
So whenever I start to draw a path the first thing I like to do is zoom into the image. Now at the very very bottom of the tool bar is a magnifying glass, that’s the zoom tool. You can also use the shortcut of holding down CONTROL and ALT (which would be COMMAND OPTION on a Mac) and then you use your scroll wheel on your mouse and you zoom in. That’s a nice, fast shortcut. If you don’t want to do that you can also click on the magnifying glass and click to zoom in. You ALT click (or OPTION click on a Mac) to zoom out. Plus sign zoom in, minus sign zoom out. That makes some sense. I’m going to zoom in pretty close, and we can start our path.
So we select the pen tool and you can start your path anywhere, I’m going to start mine right here on this corner. And drawing a path takes a little bit of time and you have to be somewhat careful but it’s really worth it when you get a selection that looks nice and sharp on the edges.
Now since we’re zoomed in, the image takes up more screen than we have. So we’ve got to reveal the image that’s falling off of our screen here. There’s the hand tool at the tool bar. You can select that, click and drag, and you will reveal more of the image. But that’s actually kind of slow. You don’t want to keep going back to the toolbar every time you want to zoom or use the hand tool to pan the image around. We need to start using some shortcuts.
So let’s reselect the pen tool. And one of my favorite shortcuts is the space bar. You hold down the spacebar, no matter what tool you’re on, and it turns it into a hand. And you grab the image, and you move it around. So as I’m making this path, you will see me use the hand tool to pan around this image. So practice using your shortcuts. They’re going to help you out a lot.
You can see I’m making a lot of anchor points. Every time there’s kind of a change in the contour of this shape, I’ll drop another anchor point down. Sometimes I’ll pull a little curve like this. Other times, if it’s a sharp point, like at the end of this petal, I’ll just do one click and make a nice, sharp corner. Oops, that one’s not right. You’ll also notice that I’m sort of picking more of the subject—I’m in the pink more than I’m in the green. And that’s okay. When you’re selecting an object, you want to be inside the object more than outside the object. You don’t want to do it too much, you don’t want to leave a lot of the detail of the subject in the background, but a few pixels on the inside is better than a few pixels of picking up the background because that contrast is really going to show up in an unattractive way when you put this subject in a different layer.
So the more you practice this, the faster you’ll be. These types of curves are called Bézier curves as well as paths. And they’re used in many different graphics applications. For example, Adobe Illustrator uses these, they’re used a lot in vector art. They’re also used in drafting, any kind of computer drafting, or 3D art you’ll use Bézier curves a lot. Also, sometimes—in areas like this it’s very clear where the petal ends and the background begins, but here, this petal is up against a petal that looks very similar. So it’s often useful to zoom back out, get a sense of what your subject is doing, and where it is. Then you can zoom back in and you can say, “Oh yeah. The petal’s right here.” I want to make sure that I pick up the subject that I want. And if the subject is similar to the background it’s a little bit more forgiving. You can go a little bit faster because once this is lifted off the background layer, it’s not going to look so stark if a little bit of the pink pixels end up in our selection. All right, we’re getting close. I’m doing this a little bit fast. Remember when you do this, take your time, use UNDO a lot. You can also go in and select an anchor point and a handle and change it. A lot of those options—if you hold down the pen tool, you can see that you can add anchor points, delete anchor points that you don’t like, or convert point tool. The convert point tool is useful for drawing new handles. So I recommend you experiment with all of those. Especially if you’ve drawn a path and you look at it and it just doesn’t look right in one area, you can fix that area.
All right, so we’ve wrapped our way all the way around this flower and we’re at the first anchor point that we drew. And you can actually see the icon changes—it shows us the closed path pen tool. So we’re going to click right on that first anchor point. And now we’ve closed our path. And we zoom back out. And let’s go to our paths palette. And there’s a lot of options—for example if we wanted to fill our path in with a solid color, let’s pick blue, then we would click on this first icon. It fills it with a blue. We’ll undo that. If we wanted to draw an outline around this, maybe we want to do a green outline, we would click this second one. It’s kind of hard to see, but it did make a green outline here. We’re going to undo that. What we want to do this time is we want to make a selection. We’re going to turn our path into a selection. There we go. We go back to our layers. And now what we want to do, is we want to lift this selection, just these pixels up off of the background and into a new layer. And there’s lots of ways to do this. For now, let’s say EDIT > COPY. Then we’re going to make a new layer. We’re going to call it “flower”, and then we’re going to go EDIT > PASTE. And you can see in the preview window that we have a flower selected. And that’s a pretty nice selection. We don’t see a lot of green fringes around the outside, it looks pretty sharp. So let’s save our work. FILE > SAVE AS… “flower.psd.” And in the next section, we’re going to use Hue, Saturation, and Brightness to change the color of this flower, and to change the background.
What are some other uses for vector paths like the ones created with the pen tool?
Vector paths like the ones created with the pen tool (also called Bézier curves) are used in all kinds of digital applications, from illustrations to 3D modeling to engineering to architecture.
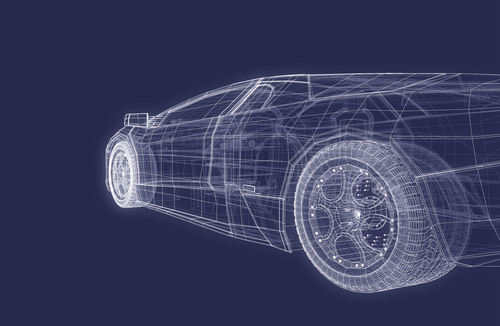 This 3D model of a sports car is made out of Bézier curves. |
