As you learned, the painterly effects that can be created with pastels have led artists who work with them to call their artwork paintings rather than drawings. Compare the following pastel artworks to their companion paintings. What aspects of the pastel make it look like a painting? How do you think the artist created the textures found in thepastels? Which medium type do you prefer? Why? Click through the slide show to see several examples.
Portrait of King Louis XV by Maurice Quentin de La Tour (Pastel) vs. Frederick the Great by Antoine Pesne (Oil Painting)
These artworks are very similar to one another. They are both portraits of an aristocratic man with armor, velvet, and other trappings of wealth. So, which one is better? That is completely up to the viewer, but they are so similar in style that the only way to tell which is pastel and which is oil is to see them in person.
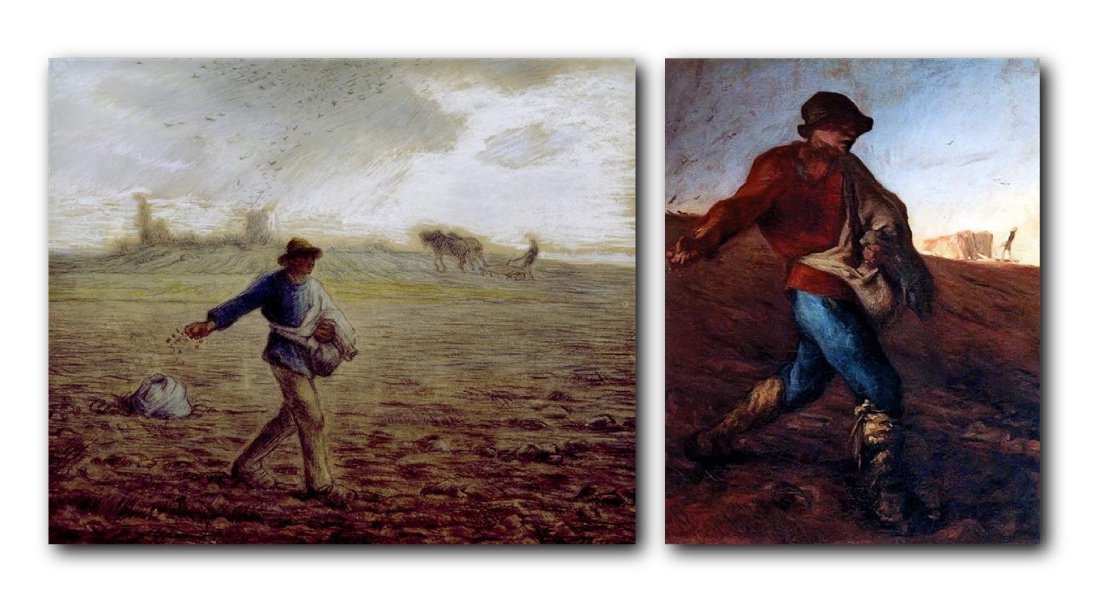
Both images are called The Sower by Jean Francois Millet. The first is pastel, and the second is done in oil.
The same artist created these artworks. Millet worked in a variety of media and often portrayed everyday people at work. These artworks both show a great deal of texture and blending. The colors in the oil painting are slightly more vibrant, but that could have been because the subject was wearing more vibrant colors. Also, while both works look "sketchy," Millet took slightly less care in blending the lines in his pastel work that make it seem more like a drawing than a painting.
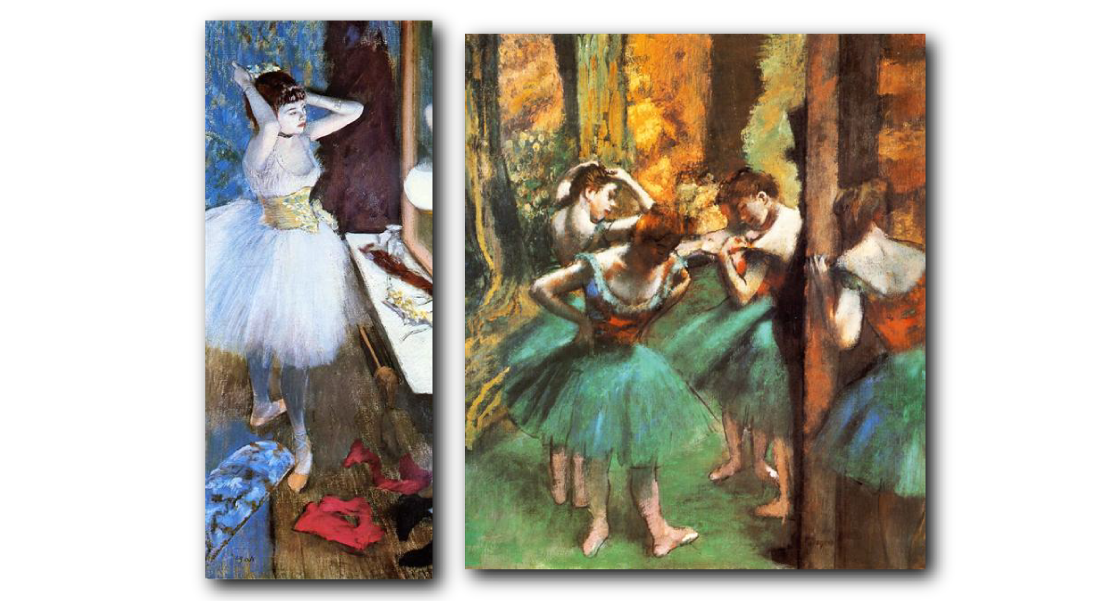
Dancer in Her Dressing Room (Pastel) and Dancers, Pink and Green (Oil Paint) by Edgar Degas
Degas was another artist who preferred to portray everyday people at work, but his chosen subjects were dancers. Much of his work is from observation, which means he needed to work quickly. The problem with oil paint is that it takes a long time to dry, so it is difficult to include fine details right away. With pastels, that isn't an issue because they lay down dry pigment that can still be blended. In these two artworks, you can see that there is more detail in the pastel than there is in the oil painting.
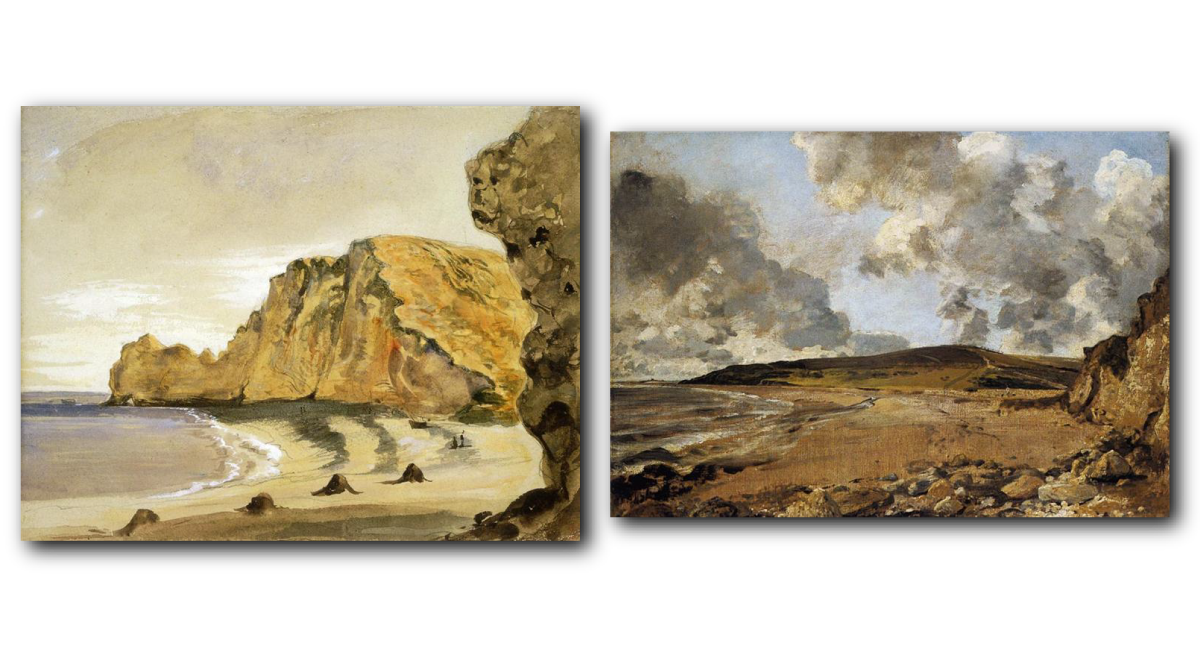
The Porte D'Amont, Etratat by Eugene Delacroix (Pastel) and Weymouth Bay with Jordan Hill by John Constable (Oil Painting)
These artworks show a similar scene--a shoreline with rock formations around it. While there are some differences in style, the pastel artwork does seem to show more lines (like a drawing) and more detail. The oil painting is more blended, and there is less detail.
Pastels can be used to create various painterly effects like blending and highlighting that are not possible with other drawing media. For example, colored pencils and graphite can be blended to an extent but not in the same way that paint can be. Pastels are different in that they can do all the same things that paint can without the long drying time. This and their portability made them a favorite of artists during the Renaissance and Impressionist periods. Pastels are still favored by artists today, including Melody Sears, Mary Monk, David Decobert, and Sharon Pomales. Take a moment to research these contemporary artists and look at their work.
Lesson Connection!
Answer the following question to see if you remember information from the last lesson!
Question
What are colored pencils made of?
Colored pencils are made of a pigment mixed with oil or wax and a binder, all encased in wood.
Text
Guided Notes
Tutor
Video
How To
Meet your new study partner! With our powerful Student Tools, your online learning experience just got more accessible,
personalized, and thought-provoking than ever before!
Do you feel like you learn better when you watch videos? You’re not alone!
Research shows instructional videos can make learners more engaged and active in online classes,
when compared to text-only lessons.
Student Tools lets you turn some lesson pages into videos instantly! Just click the Student Tools tab and select Video.
Remember, video instruction is not available on every lesson page.
Go back to the lesson page any time by closing the Student Tools window.
Sometimes when you learn, it can feel like you’re just not getting it. Maybe you don’t really know what all the words on
the page mean, or you have to read a paragraph two or three times to understand what it’s about.
If this happens to you, just click the Student Tools tab and choose “Text.” This will automatically
simplify the instruction, making it easier to understand and remember.
Go back to the lesson page any time by closing the Student Tools window.
The science is in, and taking notes is one of the best ways to reinforce your learning.
Notes work even better when you write them by hand, since you’re more likely to put complex new ideas
in your own words and remember them longer.
You can quickly and easily access guided notes, as well as key lesson vocabulary,
by clicking Student Tools > Notes. Choose a PDF or Word Doc,
and fill them out online -- or even better-- print them out and take notes by hand!
Go back to the lesson page any time by closing the Student Tools window.
Imagine a teacher you can contact anytime, who is happy to answer all your questions and
knows pretty much everything in the world about the subject you need help with.
Say, “Hello!” to your Tutor! Click on Student Tools > Tutor, and ask any question about your class.
Your Tutor is super smart! You can ask the Tutor to explain things more clearly, make connections
between ideas, or even give you custom quizzes and feedback. You can click the links under References to learn more.
Go back to the lesson page any time by closing the Student Tools window.
Student Tools lets you create your own Flashcard decks to help you study. To get started, click Student Tools >
Flashcards. Press Add New Set and give it a title.
Now, decide what will be on the front and back of your first card. It can be a term and definition, a challenging question,
or even a funny phrase that helps you remember something. Click Add Card to Set to make a new Flashcard.
You can delete sets or cards by clicking the trash can icon. When you’re done, click Save Cards to Set.
Now you can Review your deck. Read the front of the card, and think of the answer. Even better, say your answer out loud! Then, click the card to flip it over.
Depending on how you did, you can either keep that card in the deck to study again by clicking Next or Previous, or if you got it right, click remove.
Remember to review your flashcards often, space out study sessions, and keep practicing until you know them all!
Go back to the lesson page any time by closing the Student Tools window.