The elements of art are color, line, shape, form, space, value, and texture. These elements make up an artwork. Every piece of art contains at least one of these elements. Look at the following artworks and try to identify at least four of the seven elements in each one (bonus if you can find all seven). Then click on each image to learn more about how the artist used the elements of art.
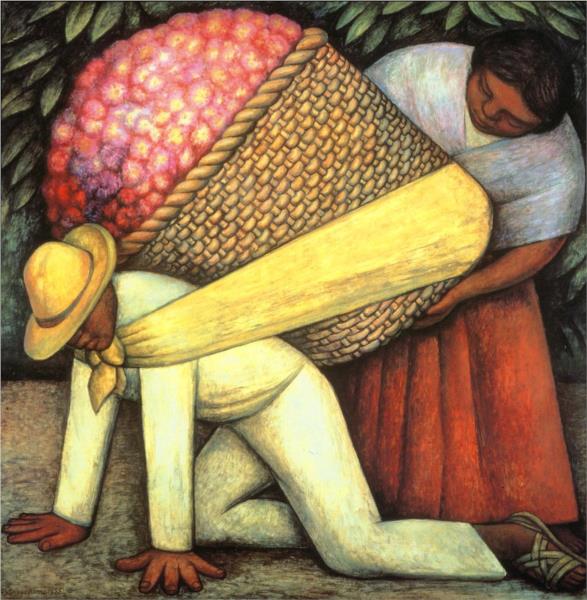
Flower Carrier by Diego Rivera, 1935
In this artwork, we can see the use of color in the flowers and the people’s clothing. Line is used in the sash to show the connection between the man and the woman and to lead the viewer’s eye across the painting. Shape and form are seen in the people and the basket. Value is used to show the pleats in the skirt, and texture is implied in the weave of the basket and the flower petals. There is a limited amount of negative space shown, but this may have been intentional to imply that the people are trapped in their day-to-day hardships.
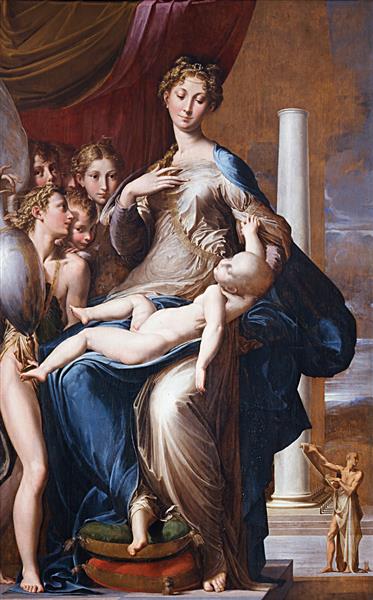
Madonna with the Long Neck by Parmigianino, 1540
In this painting, color appears in the drapery and robes (a blue robe is traditionally used to identify Jesus’s mother, Mary). Shape and form are seen in the figures and the background. Line is found in the clothing and structures, with all of them either mirroring Mary’s posture or leading the eye to her and the baby Jesus. Texture and value are also seen in the clothing and drapery. Space is shown both in the almost cramped interior scene between Mary and the angels and also in the far-off landscape seen behind them.
The Old Blind Guitarist by Pablo Picasso, 1903
In this painting, Picasso uses the color blue to communicate the sadness and despair the man is feeling. The artist uses line, shape, and form to give the man’s body a disjointed, uncomfortable look that makes him seem more pitiful. Value and texture are seen in the man’s face, hair, and clothes. Space is used to make the man seem cramped or trapped in his sad state.
The elements of art are what an artwork is made up of, and the principles of art are how those elements are used within that artwork. Now that you have reviewed the elements, let’s move on to the principles.
Text
Guided Notes
Tutor
Video
How To
Meet your new study partner! With our powerful Student Tools, your online learning experience just got more accessible,
personalized, and thought-provoking than ever before!
Do you feel like you learn better when you watch videos? You’re not alone!
Research shows instructional videos can make learners more engaged and active in online classes,
when compared to text-only lessons.
Student Tools lets you turn some lesson pages into videos instantly! Just click the Student Tools tab and select Video.
Remember, video instruction is not available on every lesson page.
Go back to the lesson page any time by closing the Student Tools window.
Sometimes when you learn, it can feel like you’re just not getting it. Maybe you don’t really know what all the words on
the page mean, or you have to read a paragraph two or three times to understand what it’s about.
If this happens to you, just click the Student Tools tab and choose “Text.” This will automatically
simplify the instruction, making it easier to understand and remember.
Go back to the lesson page any time by closing the Student Tools window.
The science is in, and taking notes is one of the best ways to reinforce your learning.
Notes work even better when you write them by hand, since you’re more likely to put complex new ideas
in your own words and remember them longer.
You can quickly and easily access guided notes, as well as key lesson vocabulary,
by clicking Student Tools > Notes. Choose a PDF or Word Doc,
and fill them out online -- or even better-- print them out and take notes by hand!
Go back to the lesson page any time by closing the Student Tools window.
Imagine a teacher you can contact anytime, who is happy to answer all your questions and
knows pretty much everything in the world about the subject you need help with.
Say, “Hello!” to your Tutor! Click on Student Tools > Tutor, and ask any question about your class.
Your Tutor is super smart! You can ask the Tutor to explain things more clearly, make connections
between ideas, or even give you custom quizzes and feedback. You can click the links under References to learn more.
Go back to the lesson page any time by closing the Student Tools window.
Student Tools lets you create your own Flashcard decks to help you study. To get started, click Student Tools >
Flashcards. Press Add New Set and give it a title.
Now, decide what will be on the front and back of your first card. It can be a term and definition, a challenging question,
or even a funny phrase that helps you remember something. Click Add Card to Set to make a new Flashcard.
You can delete sets or cards by clicking the trash can icon. When you’re done, click Save Cards to Set.
Now you can Review your deck. Read the front of the card, and think of the answer. Even better, say your answer out loud! Then, click the card to flip it over.
Depending on how you did, you can either keep that card in the deck to study again by clicking Next or Previous, or if you got it right, click remove.
Remember to review your flashcards often, space out study sessions, and keep practicing until you know them all!
Go back to the lesson page any time by closing the Student Tools window.